Bicep parameters from Azure Table Storage
Learn how to serve bicep parameters via a table storage
Hello!
I want to dive into my blog life with the idea of getting bicep parameters from table storage to bicep deployments.
In the last time, I've been working on a project about automatic bicep deployment for managed service customers. The goal to achieve was deploying resources to a customer tenant from the MSP-tenant without giving the customer access to the MSPs environment, code or IP.
Furthermore the customer should have the possibility to change his deployment via a custom web application.
Of course, these deployment changes will require manipulating parameters in our pipelines respective bicep deployments. This may become quite hard, if we serve this via the common way.
The common way
Normally, parameters in bicep are handed over via JSON files like these:
{
  "$schema": "https://schema.management.azure.com/schemas/2015-01-01/deploymentParameters.json#",
  "contentVersion": "1.0.0.0",
  "parameters": {
    "PARAM1": {
      "value": ""
    },
    "PARAM2": {
      "value": ""
    },
    "PARAM3": {
      "value": ""
    }
  }
}
(You can also have a look on here -> Create parameter file for Bicep - Azure Resource Manager | Microsoft Learn)
This may work in a small scale environment, but if you want to grow larger (maybe think about to follow a IaC only strategy) it will become quite difficult and confusing when using tons of this parameter files.
It is also not so easy and beautiful to generate JSON files and put it somewhere for automatic deployments.
So we started to think about, how we can provide a structured source for our deployments and improve this workflow.
The idea
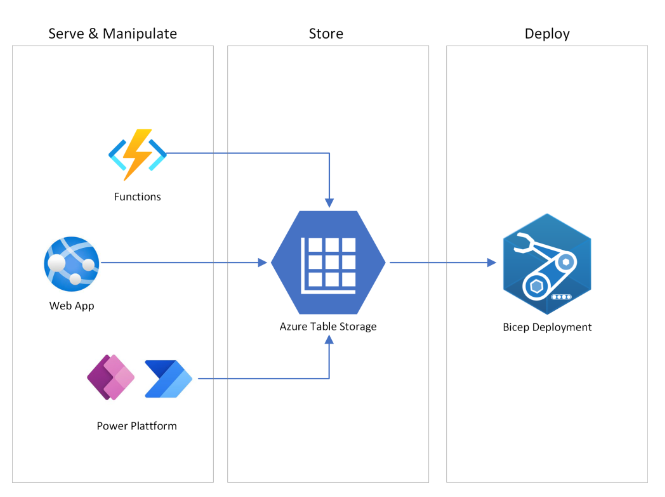
We found the solution in serving bicep parameters with Azure Table Storage.
The Azure-native NoSQL solution provides us a structured environment to store all needed parameters. It also gives us a strong API and SDKs to change its data from nearly anywhere.
There are also premium connectors for the Power Platform, what gives us so many ways of automatism.
Data structure
So to follow this way, we firstly had to design our table data structure.
Azure Table Storage are, as mentioned, NoSQL.
If you need basic information about NoSQL data structure (Partitions, Rows, Entities) check this: Table storage concepts
We've decided to structure the data as follows:
- Storage Account
- per Tenant
(we used a Base64 encoded string of the Tenant-ID for naming)
- per Tenant
- Table
- 1x table named "BicepDeployment"
- Partition
- per Workload/Landing zone
- Row
- per Deployment
- Entity
- per Parameter
This data structure was fitting for our needs. Maybe you'll be better with some changes in this concept, which are highly different concerning to your environment and intentions about IaC.
Let's try!
Preparation
It's time to start a demo for you guys. Let's begin with what you'll need:
- a demo subscription
- Microsoft Azure Storage Explorer (download)
- a Storage Account in your subscription
provisioning of table storage
We'll deploy a Test-Workload which consists of a VM within a resource group and a VNet. So just basic.
Get your Storage Explorer, log in and navigate to the storage account. Add a table and a row to it.
It should look like this:

Create a DEVOPS Organization (if you haven'T done yet)
If you doesn't already have an Azure DevOps Environment:
- sign in to https://dev.azure.com
- create a new organization
- request free parallel instances for your organization via https://aka.ms/azpipelines-parallelism-request
This may take a few business days.
The demo repository
In the next step, we'll need bicep-templates and pipelines for our deployment. There you have a GitHub with our Demo Project:
GitHub - Demo Bicep Deployment
It consists of a main.bicep which will do our deployment from the modules in the modules folder.
Furthermore we also have a demo-deployment.yml for your DevOps Pipeline and a PowerShell Module, which enables you to call your table storage more efficiently.
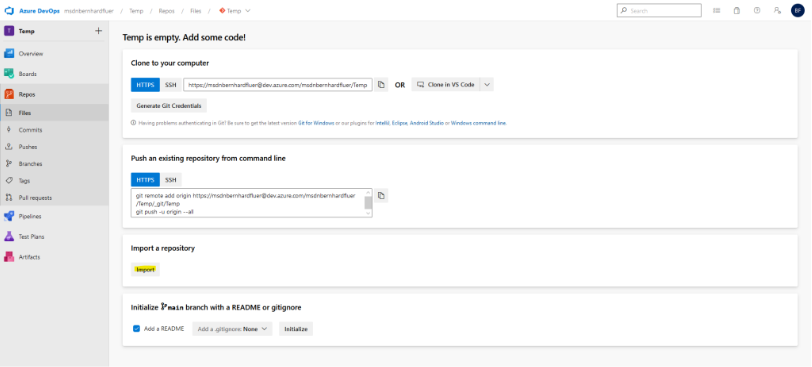
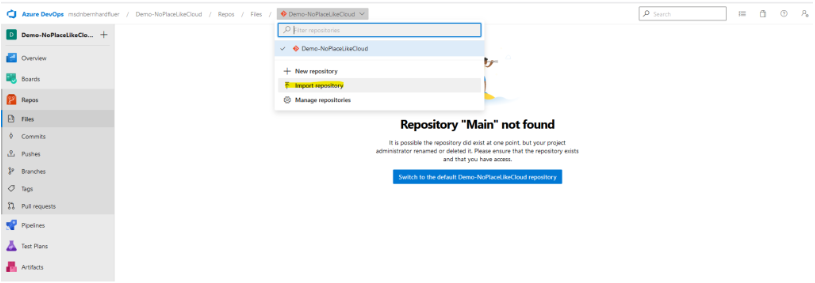
You should clone this repository to a new project in your DevOps organization.
Fill the parameters
Now you should have a look at your main-file and note all parameters. I collect them and wrote them unterneath here:
param nameRgNetwork string
param nameRgComputing string
param location string
param VNETName string
param VNETPrefix string
param SNETName string
param SNETPrefix string
param VMName string
param VMSize string
param localAdminUser string
@secure()
param localAdminPasswd string
Grab these parameters and fill it into the appropriate row in your table storage. (be aware of the exact spelling)
Finally, it should look like this:

Set up your pipeline
To deploy azure resources via pipelines, a service connection to your subscription is needed. To simplify this, I will assume that you have your demo subscription in the same tenant as your DevOps organization.
You can create this connection by the following steps:
- On the left bottom corner, click "Project settings"
- Navigate to Pipeline -> Service connection
- Click "Create Service connection"
- Click Azure Resource Manager (automatic) and fill the required fields
- Voilà!
So now... let's have a look at the YML-File in the repository:
# NoPlaceLike Cloud - Free to use :)
#
# Deployment Pipeline for Demo Project

trigger: none

pool:
  vmImage: ubuntu-latest

variables:
  - name: StorageAccountName
    value: ""
  - name: StorageAccountRG
    value: ""
  - name: TableName
    value: "BicepDeployment"

steps:
- task: AzurePowerShell@5
  displayName: Deploy with Azure Storage Table
  env:
      WorkloadName: "NPLCTestWorkload"
      DeploymentName: "Deployment"
  inputs:
    azureSubscription: '' ## Fill here your Service Connection
        ScriptType: 'InlineScript'
    azurePowerShellVersion: 'LatestVersion'
    Inline: |
      Import-Module $(Build.SourcesDirectory)/powershell/Table-Storage.psm1
      Import-Module AzTable

      $DeploymentParameters = Read-TableStorage `
        -StorageAccountName $env:StorageAccountName `
        -TableName $env:TableName `
        -StorageAccountRG $env:StorageAccountRG `
        -PartitionKey $env:WorkloadName `
        -RowKey $env:DeploymentName

      New-AzSubscriptionDeployment `
        -Location $DeploymentParameters.location `
        -TemplateFile $(Build.SourcesDirectory)/main.bicep `
        -TemplateParameterObject $DeploymentParameters
All colored lines have to get filled from your custom information.
'azureSubscription': have to get filled with the name of your service connection.
'StorageAccountRG': has to contain the resource group name of your storage account.
The task will get the required parameters for the deployment and runs the deployment in your subscription.
So now you can get the YML file in an Azure Pipeline:
- Click to the "Pipelines" field in the left-hand control plane
- Click "Create Pipeline"
- Select Azure Repos Git as your code source
- Select the repository
- Select "Existing Azure Pipelines YAML File"
- Choose the deployment-pipeline.yml file
Thereafter, you should see the pipeline-code, and you can save the pipeline by clicking on the little arrow right to the button, where you can find the Save button.
Ready to GO!
So now you can test your deployment by running your pipeline. Change your parameters in the Table Storage to see how your bicep deployment is changing with it.
This is only a tiny test, just to give you an idea about the concept. If you want to grow larger, maybe with multi-stage deployment, this will become awesome!
I hope that this can help you to revolution your IaC deployments!
Cheers :)